
Move Tool and Crop Tool
it19 :: Lessons :: Photoshop Lessons
Page 1 of 1

Move Tool and Crop Tool
![]() by Wingedge Sat Aug 09, 2008 11:06 pm
by Wingedge Sat Aug 09, 2008 11:06 pm
Photoshop - The Move Tool - V
The move tool moves a selection or an entire layer around on the canvas. Access the move tool by clicking the arrow icon at the top of the tool bar or press V as the keyboard shortcut.
The Move Tool - V:

Photoshop - Moving Selections
Move a selection by first having a selection active via the Marquee Tool and then clicking the left mouse button and dragging the selction about the canvas.
Selections can also be "nudged" using the arrow keys on the keyboard. Nudging moves the selection one pixel at a time pressing shift+arrow key will nudge the selection 10 pixels at a time.
Also, please take note that Photoshop will not allow you to move an empty selection. Selections can quickly be filled with the foreground color by tapping alt+backspace or option+backspace and then the selection can be moved about the canvas. Pressing delete will remove the filling.
Moving Selections:

Photoshop - Moving Layers
An entire layer can be moved by first clicking on the layer from the layers palette to activate it. Then click on the canvas and move the layer about the screen or nudge it here and there using the arrow keys.
Move a Layer:

Photoshop - Move Tool Options
The annoyance of always having to select the move tool icon is overshadowed by its enormous array of options.
Photoshop - Auto Select Layer Option
Checking this option means that when a selection is clicked to be moved, the layer which contains that selection will also be selected allowing for easy moving of a selection. This comes in handy when we learn about saving selections.
Auto Select Layer Option:

Photoshop - Show Bounding Box
The Show Bounding Box option highlights the selection with a 9 point box. Clicking and dragging on a point will stretch or shrink the selection. Dragging the center point skews the selection.
The bounding box works the same as does the transform command. Press Ctrl+T or Command+T to transform a selection.
Show Bounding Box:

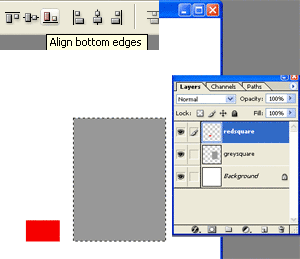
Photoshop - Move Tool Alignment Options
Layer Alignment Options:

The next several icons are used to align entire layers with another. These tools automatically calculate where to move a layer to align the vertical and horizontal edges as well as the horizontal and vertical centers. To use these icons you must have two layers, then make a selection on one layer and activate the layer you wish to align the selection with.
Align Layers:
The move tool moves a selection or an entire layer around on the canvas. Access the move tool by clicking the arrow icon at the top of the tool bar or press V as the keyboard shortcut.
The Move Tool - V:
Photoshop - Moving Selections
Move a selection by first having a selection active via the Marquee Tool and then clicking the left mouse button and dragging the selction about the canvas.
Selections can also be "nudged" using the arrow keys on the keyboard. Nudging moves the selection one pixel at a time pressing shift+arrow key will nudge the selection 10 pixels at a time.
Also, please take note that Photoshop will not allow you to move an empty selection. Selections can quickly be filled with the foreground color by tapping alt+backspace or option+backspace and then the selection can be moved about the canvas. Pressing delete will remove the filling.
Moving Selections:
Photoshop - Moving Layers
An entire layer can be moved by first clicking on the layer from the layers palette to activate it. Then click on the canvas and move the layer about the screen or nudge it here and there using the arrow keys.
Move a Layer:
Photoshop - Move Tool Options
The annoyance of always having to select the move tool icon is overshadowed by its enormous array of options.
Photoshop - Auto Select Layer Option
Checking this option means that when a selection is clicked to be moved, the layer which contains that selection will also be selected allowing for easy moving of a selection. This comes in handy when we learn about saving selections.
Auto Select Layer Option:
Photoshop - Show Bounding Box
The Show Bounding Box option highlights the selection with a 9 point box. Clicking and dragging on a point will stretch or shrink the selection. Dragging the center point skews the selection.
The bounding box works the same as does the transform command. Press Ctrl+T or Command+T to transform a selection.
Show Bounding Box:
Photoshop - Move Tool Alignment Options
Layer Alignment Options:
The next several icons are used to align entire layers with another. These tools automatically calculate where to move a layer to align the vertical and horizontal edges as well as the horizontal and vertical centers. To use these icons you must have two layers, then make a selection on one layer and activate the layer you wish to align the selection with.
Align Layers:

Wingedge- Admin
-

Number of posts : 53
Age : 40
Name : Sir Francis
Year : Instructor
Registration date : 2008-06-17 -

Re: Move Tool and Crop Tool
![]() by Wingedge Sat Aug 09, 2008 11:06 pm
by Wingedge Sat Aug 09, 2008 11:06 pm
Photoshop - Crop Tool - C
Use the crop tool in Photoshop to crop down an image. Trim away portions of a photo that you may not particularly like and focus on the section of the image that you want to highlight. Select the crop tool from the Tool Bar by pressing C.
Crop Tool - C:

Drag a selection with the crop tool just as you would the marquee tools. Use the space bar and shift keys to drag and shape the rectangle about the canvas. Once you have a selection you are happy with, press enter to crop the rest of the picture away.
Crop Away!:

Photoshop - Crop Tool Options Bar
The arrow by the icon for the crop tool drops down into a list of common picture sizes. Use these if you plan on printing the image and framing it in a standard frame.
Crop Tool Presets:

While these presets offer a precise means to crop an image down to the desired size. This tool does not solve the problem of reducing the size of an entire image. Photoshop does have a solution to this problem, you may change the entire size of an image by clicking on the Image menu at the top of the screen and selecting the Image Size... option.
Use the vacant input boxes as a means to specify your own dimensions and resolution. Resolution has to do with the quality of the image, set a higher resolution to increase picture quality. Be aware that increasing a resolution of an image also increases the file size of that image - not so super for web developers.
Crop Tool Option Bar:

Photoshop - Crop Tool Second Options bar
After dragging and dropping a crop. Before pressing enter to confirm the cropping, another options bar appears at the top of the screen.
More Crop Tool Options:

Photoshop - Crop Tool Mouse Work
Rotate the cropping by clicking behind one of the points and swinging your mouse about the canvas. Clicking on a point will allow you to additionally modify the size of the cropping.
Mouse Work:


Rotating the cropping as we've done above skewed the sphere creating more of a three dimensional oval - egg shape.
Use the crop tool in Photoshop to crop down an image. Trim away portions of a photo that you may not particularly like and focus on the section of the image that you want to highlight. Select the crop tool from the Tool Bar by pressing C.
Crop Tool - C:
Drag a selection with the crop tool just as you would the marquee tools. Use the space bar and shift keys to drag and shape the rectangle about the canvas. Once you have a selection you are happy with, press enter to crop the rest of the picture away.
Crop Away!:
Photoshop - Crop Tool Options Bar
The arrow by the icon for the crop tool drops down into a list of common picture sizes. Use these if you plan on printing the image and framing it in a standard frame.
Crop Tool Presets:
While these presets offer a precise means to crop an image down to the desired size. This tool does not solve the problem of reducing the size of an entire image. Photoshop does have a solution to this problem, you may change the entire size of an image by clicking on the Image menu at the top of the screen and selecting the Image Size... option.
Use the vacant input boxes as a means to specify your own dimensions and resolution. Resolution has to do with the quality of the image, set a higher resolution to increase picture quality. Be aware that increasing a resolution of an image also increases the file size of that image - not so super for web developers.
Crop Tool Option Bar:
Photoshop - Crop Tool Second Options bar
After dragging and dropping a crop. Before pressing enter to confirm the cropping, another options bar appears at the top of the screen.
More Crop Tool Options:
Photoshop - Crop Tool Mouse Work
Rotate the cropping by clicking behind one of the points and swinging your mouse about the canvas. Clicking on a point will allow you to additionally modify the size of the cropping.
Mouse Work:
Rotating the cropping as we've done above skewed the sphere creating more of a three dimensional oval - egg shape.
Wingedge- Admin
-
Number of posts : 53
Age : 40
Name : Sir Francis
Year : Instructor
Registration date : 2008-06-17 -
it19 :: Lessons :: Photoshop Lessons
Page 1 of 1
Permissions in this forum:
You cannot reply to topics in this forum